Insight Cruise Control
How I Installed Cruise Control On Our Insight
|
DISCLAIMER:
This write-up is a record of my cruise control installation.
The author makes no guarantee of accuracy and is not responsible for any
damage to vehicle or occupants should you decide to install a cruise
control using this as a guide. If installing a similar device in
your vehicle, be sure to follow the instructions provided by the
manufacturer. Contact the manufacturer if you have any questions. |
A puzzling fact about the Insight is that Honda doesn't offer a
cruise control unit for it. Our best guess is that the marketing geniuses
over in Japan figure that it's a short-distance commuting vehicle, and doesn't
need one. Well, here in America we think differently. Shortly after
getting our Insight, I read about a person installing an aftermarket cruise
control unit on his car. Yahoo
Groups has an internet mailing list for Insight owners which allows hundreds
of Insight owners to share information, and if you're an Insight owner and
haven't visited the list, you should check it out. It's where I learned
about the Rostra cruise control.
Acknowledgement
I'd like to thank George Yeager for his inspiration to move
forward with my cruise control installation. George was the first person
to document the installation of cruise control on an Insight via a website
and he didn't have the luxury of having Rostra's Insight throttle adapter
kit! He came up with a brilliant solution to the problem, and several
months later, Rostra came out with the throttle adapter bracket to simplify the
installation.
To install cruise control on the Insight, you'll need to pick up
the following Rostra parts:
| 250-1223 |
Global Cruise unit |
| 250-4325 |
Insight throttle adapter |
| either 250-3421 or 250-1483 |
control switch or RF control switch |
I opted for the wireless control switch (250-1483), which I can
highly recommend because it was easy to install, attaches directly to the
steering wheel and looks like it was made for the car. Total cost for me:
$310.78. I ordered mine from United Speedometer in Riverside,
California. Their number is 909-684-0292.
Total installation time for me was 7.5 hours, but a lot of that
time was spent puzzling around with some questionable instructions, so I'll bet
I could do it a second time in about 3 hours.
Getting Started
I started the job by installing the throttle adapter, where the
cruise control connects to the engine's throttle. It's the "business
end" of the job and I figured I'd get it out of the way first. It
took me a couple of minutes just to locate the throttle (I don't have a service
manual for the Insight). Note to myself: Pick up a service manual
sometime! It'll save a lot of grief.
I went ahead and prepared threads on the cruise control cable sheath,
as shown in the Rostra instructions. They tell you to make 6" of
threads; I only used about 3" of them.
It turns out that the Insight's throttle is just behind the
radiator, just left of center. To get to it effectively, I needed to
remove a couple of parts.
|
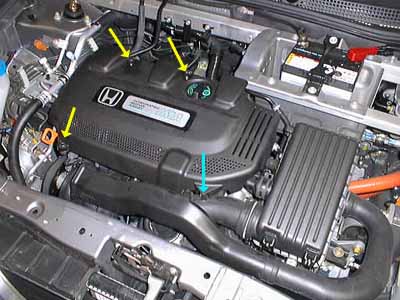
The first thing I did was remove the plastic
cover on top of the engine. It isn't absolutely necessary but I
found it helpful. I had to remove three 10mm acorn nut
fasteners with washers (yellow arrows). The acorn nut at lower
left in the photo (on my car, anyway) came off with the threaded rod,
which I assume was intentional.
To remove the cover, I unhooked the cover
from where it snaps into the rubber intake hose (blue arrow). |
 |
|
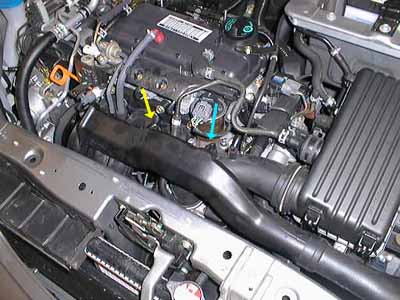
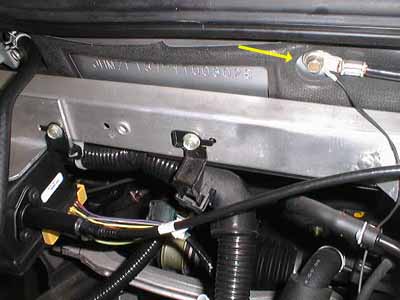
Once the big cover is off, I had to
remove the rubber intake horn, which is right behind the hood latch and
sits on top of the throttle area.
To do this, I removed the 10mm bolt (yellow arrow) and
unhooked the intake from where it snaps into the rubber intake hose (blue
arrow). Then I lifted up the intake horn and wiggled it out of the
friction-fit connector in front of the air filter box. |
 |
|
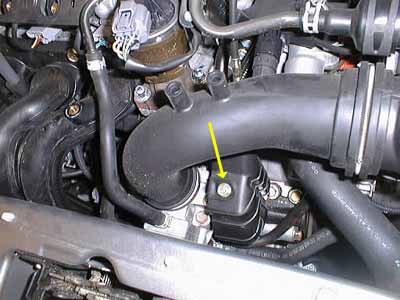
With the intake horn removed, the black
plastic throttle drum cover is exposed. I removed the 10mm bolt and removed the
cover.
Once removed, I stored it away in my spare
parts bin because it won't fit back on with the Rostra throttle adapter
in place. |
 |
|
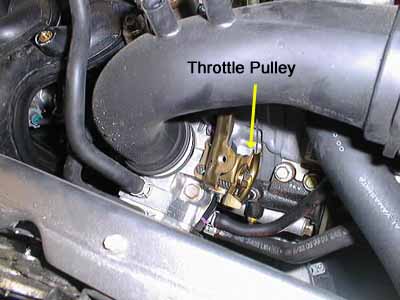
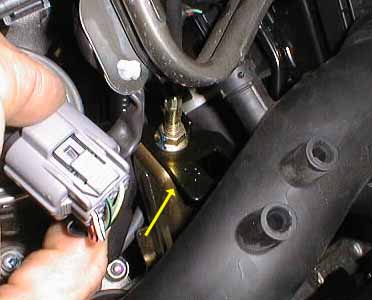
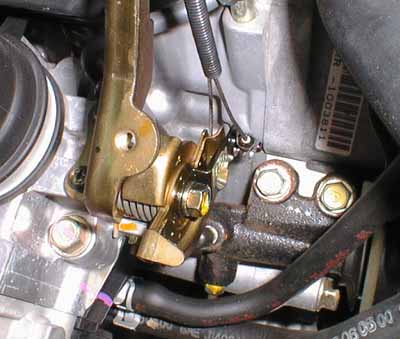
Here's how the throttle assembly looked at this
point. You'll see the gold throttle pulley with the throttle cable
coming off it at the rear. Follow the cable upward and you'll see
where it is fastened to a gold-colored metal bracket with a flanged hex
hut (see next photo, below) |
 |
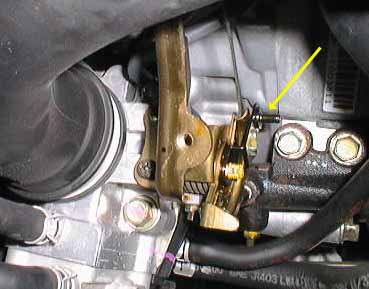
| The next thing I did was loosen the throttle cable's
flanged hex nut, carefully holding the throttle cable sheath so that the
second nut, holding the cable below the metal bracket, didn't
move. I loosened this flanged nut a few turns, and slipped the
Rostra-supplied cable bracket under the flange as shown at right (yellow
arrow). I tightened the nut securely. |
 |
|
Now I removed the nut and lockwasher from the
throttle drum so that I could install Rostra's Insight throttle adapter
bracket. This was a bit tricky -- The nut is held in place with
Locktite and as I tried to loosen the nut, the throttle drum wanted to
move instead of the nut. I held the drum in place as I removed the
nut and washer.
I then slipped the throttle adapter bracket onto the throttle
pulley hub as shown (yellow arrow). I replaced the lockwasher and
nut. I reapplied some Locktite to the nut to make sure it doesn't
go anywhere. |
 |
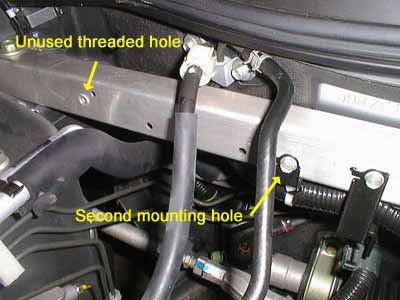
| To mount the cruise control module, you can either use the
bracket provided by Rostra or build a custom bracket. I opted for
the latter because I didn't feel like drilling any holes in my car, and
it just so happens that there's a perfect place to mount it, and the
Rostra-supplied bracket's holes aren't spaced right. The mounting
location I used is on the passenger side, on the aluminum box beam just
in front of the firewall. As shown in the photo, there is an
unused threaded hole on the left, and a conduit support bolted in on the
right that I used to mount the bracket. |
 |
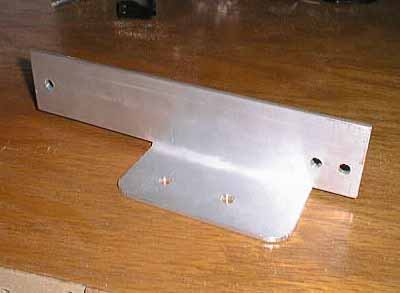
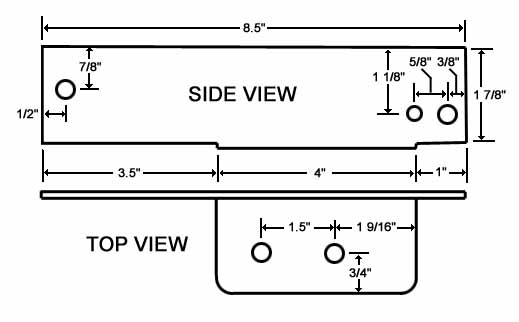
| The bracket itself is a piece of 2-inch aluminum angle
stock I bought at my local True Value hardware store. You can get
this at any good hardware store or home center.
My bracket is 8.5" long. I drilled two bolt holes on the back
side and an alignment hole for the conduit support bracket on the
right. The bottom is cut to clear the air-conditioner hose on the
left and the conduit support on the right, and drilled to accommodate
the Rostra unit's two bolts.
A measured drawing of this bracket can be found here. |
 |
Prior to mounting the module, I set the programming switches according to the
following scheme:
| Gain (Sensitivity) |
Mid |
| Pulses/Mile |
4000 |
| Engine/SetUp Timer |
4 Cylinder/Low |
| VSS Source |
Square wave |
| Transmission |
Manual |
| Control Switch |
Open Circuit (250-1483) |
| Here's the mounted cruise control module. Note how
the conduit support bracket fits perfectly on the right side.
Using aluminum for the mounting bracket insures that you won't get
any unwanted electrolysis and it looks like the module was there from
the Honda factory.
Note: I had to go to the hardware store and pick up a metric
bolt to use in that left hole. It's a 6mm bolt. |
 |
|
Now comes the part that I fussed over for quite some
time. The Rostra instructions are really vague here, and
the customer support line was closed for the day, so I
had to wing it. You need to attach the Rostra cable to the
throttle adapter bracket. There are a bunch of instructions
concerning throttle cable travel measurement and cable slack. I
installed my take on the proper setup but when I talked to a Rostra
technician a couple of days later, he told me to use the following
procedure: Connect the Rostra cable to an eyelet
connector, using a connector cover. Adjust the snap-in connector
on the cable sheath so that when the eyelet connector is slipped over
the throttle adapter bracket's pin, there's just a little bit of slack
in the cable. Insert a cotter pin through the small hole in the
adapter bracket pin. I double-checked for proper action of
the throttle. This is VITAL because the throttle can stick open if
the cable hangs up! |
 |
|
Now comes the wiring part. I connected a little
alligator-clip jumper wire between the battery negative terminal and
ground, removed the battery's ground connector bolt and slipped the
Rostra unit's ground into it, then re-inserted the bolt.
The jumper wire simply made sure I never completely
disconnected the electrical system. I wasn't sure what that would
do to the security system, radio, etc. |
 |
|
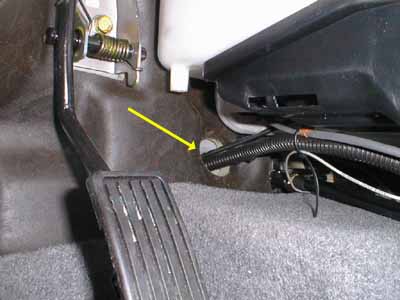
Next, I ran the cruise control wiring
harness into the passenger compartment. I didn't want to drill any
holes in the car, so I used the existing hole where the heater control
cable passes through. You can find this easily by looking under
the dashboard to the right of the accelerator pedal (see photo).
I disconnected the two four-pin connectors on the harness
and carefully passed them through the hole, next to the heater
cable. These connectors are just barely able to pass by the cable,
so I had to be careful not to damage them while cramming them through!
I wrapped the wires in the plastic sheath provided and
cable-tied the bundle neatly in the engine compartment. |
 |
Most of the rest of the installation is straightforward. Once I
brought the wiring harness into the passenger compartment, I had to hook up taps into the brake light switch
wires (the wire color coding was provided with the
Insight throttle adapter kit) and the clutch switch. The only gotcha here is that (at least
in my kit) the clutch switch came with a connector that didn't fit anything
on my wiring harness. I simply cut off the connector they had on it
and hooked it to the brake switch as indicated in their instructions for a
combination brake & clutch switch. You don't need the blue wire in
the harness; it's for the tachometer and you don't need it with the clutch
switch provided. The manual says to ground the wire if it's not being
used -- This keeps it from introducing erroneous signals into the
system. I used a tap connector and tied it to the ground wire under
the dashboard.
|
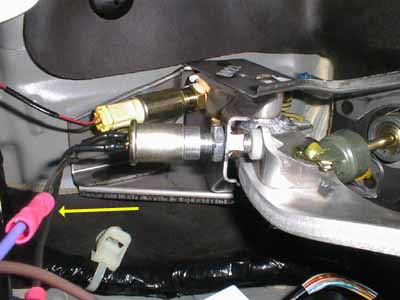
Here's how the clutch switch looks in the Insight.
I removed the clutch stop bolt, noting the spacing between the
clutch pedal arm's white plastic cushion and the nut on the
mounting bracket and making sure the clutch switch is at the same spacing
(on my car, this was a little over 1/8").
Note the violet wire from the cruise harness running to
the clutch switch, connected by a butt-splice connector (yellow
arrow). The other wire from the clutch switch runs to the brake
light negative wire. |
 |
|
The second big gotcha in the installation was finding
the VSS (Vehicle Speed Sensor) wire. The instructions say it's pin
#5 of the 31-pin blue connector in the floor of the car. Oh---kayyy....
After about 45 minutes of looking, I finally found the
connector. I had to peel back the carpeting under the dash
on the passenger side and expose the black plate shown in the
photo. I removed the 4 nuts holding the plate down and carefully lifted
it. There are four cable bundles running to a computer box
underneath it, and they don't have a lot of slack! |
 |
|
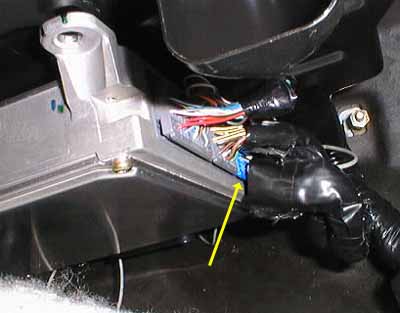
The blue connector mentioned in the instructions is shown in the photo
at right with the yellow arrow. I carefully unclipped the connector
(there's a release clip on the top) and pulled it out. I cut back the
black plastic tape wrapping a bit and located the blue/white wire running
to pin 5.
I used a tap connector to tie the VSS wire (gray) to the
blue/white wire.
When done, I carefully reinserted the blue connector and replaced the panel and
carpet. |
 |
The rest of the wiring was simple, I hooked up the control switch module to
the harness, connected its power line to the fuse block on the left side under
the dashboard using the handy little tap gizmo that wedges in under a
fuse. To hook up the ground wire, I crimped on a ring terminal, removed
one of the bolts below the fuse block, slipped on the terminal and tightened it
up.
|
The wireless cruise control switch was simplicity itself. It clips
to the steering wheel as shown in the photo, and absolutely looks like
original equipment! |
 |
To wrap up the installation, I zip-tied all the wires under the dashboard and
double-checked everything for accuracy.
|
Here's what the inside of the engine compartment looks like now.
The only non-stock item readily visible is the cruise control cable,
which is zip-tied to the battery retainer strap (yellow arrow). |
 |
I took the car out for a spin and everything worked perfectly. A few
days later, I gave the system a real-world shakedown with a 430-mile trip to St.
Louis MO and back. Fuel economy wasn't what I had hoped (61 MPG), but then
again I was driving around 73 MPH. When I was running between 65 and 70
MPH, I was seeing 70 MPG.
In summary, this cruise control installation was an unqualified
success. I wish I had done it earlier. The Rostra system is
perfectly suited for the Insight and makes those long trips a lot nicer.
Back to main EV page
This page last edited May 26, 2002